Arduino Keys: Step-by-Step Guide to Your First Electronic Piano
For this tutorial, I’ll be walking you through building your own 25 key keyboard, using an Arduino Mega, a buzzer and some push buttons. To start, let’s make sure we have all of the necessary components for our piano.
Supplies:
**Optional Supplies:
Breadboard wires (for keeping the layout clean and organized)
Zip ties (to keep your jumper wires in order)
Scissors to cut the excess from resistors and zip ties
Assembly:
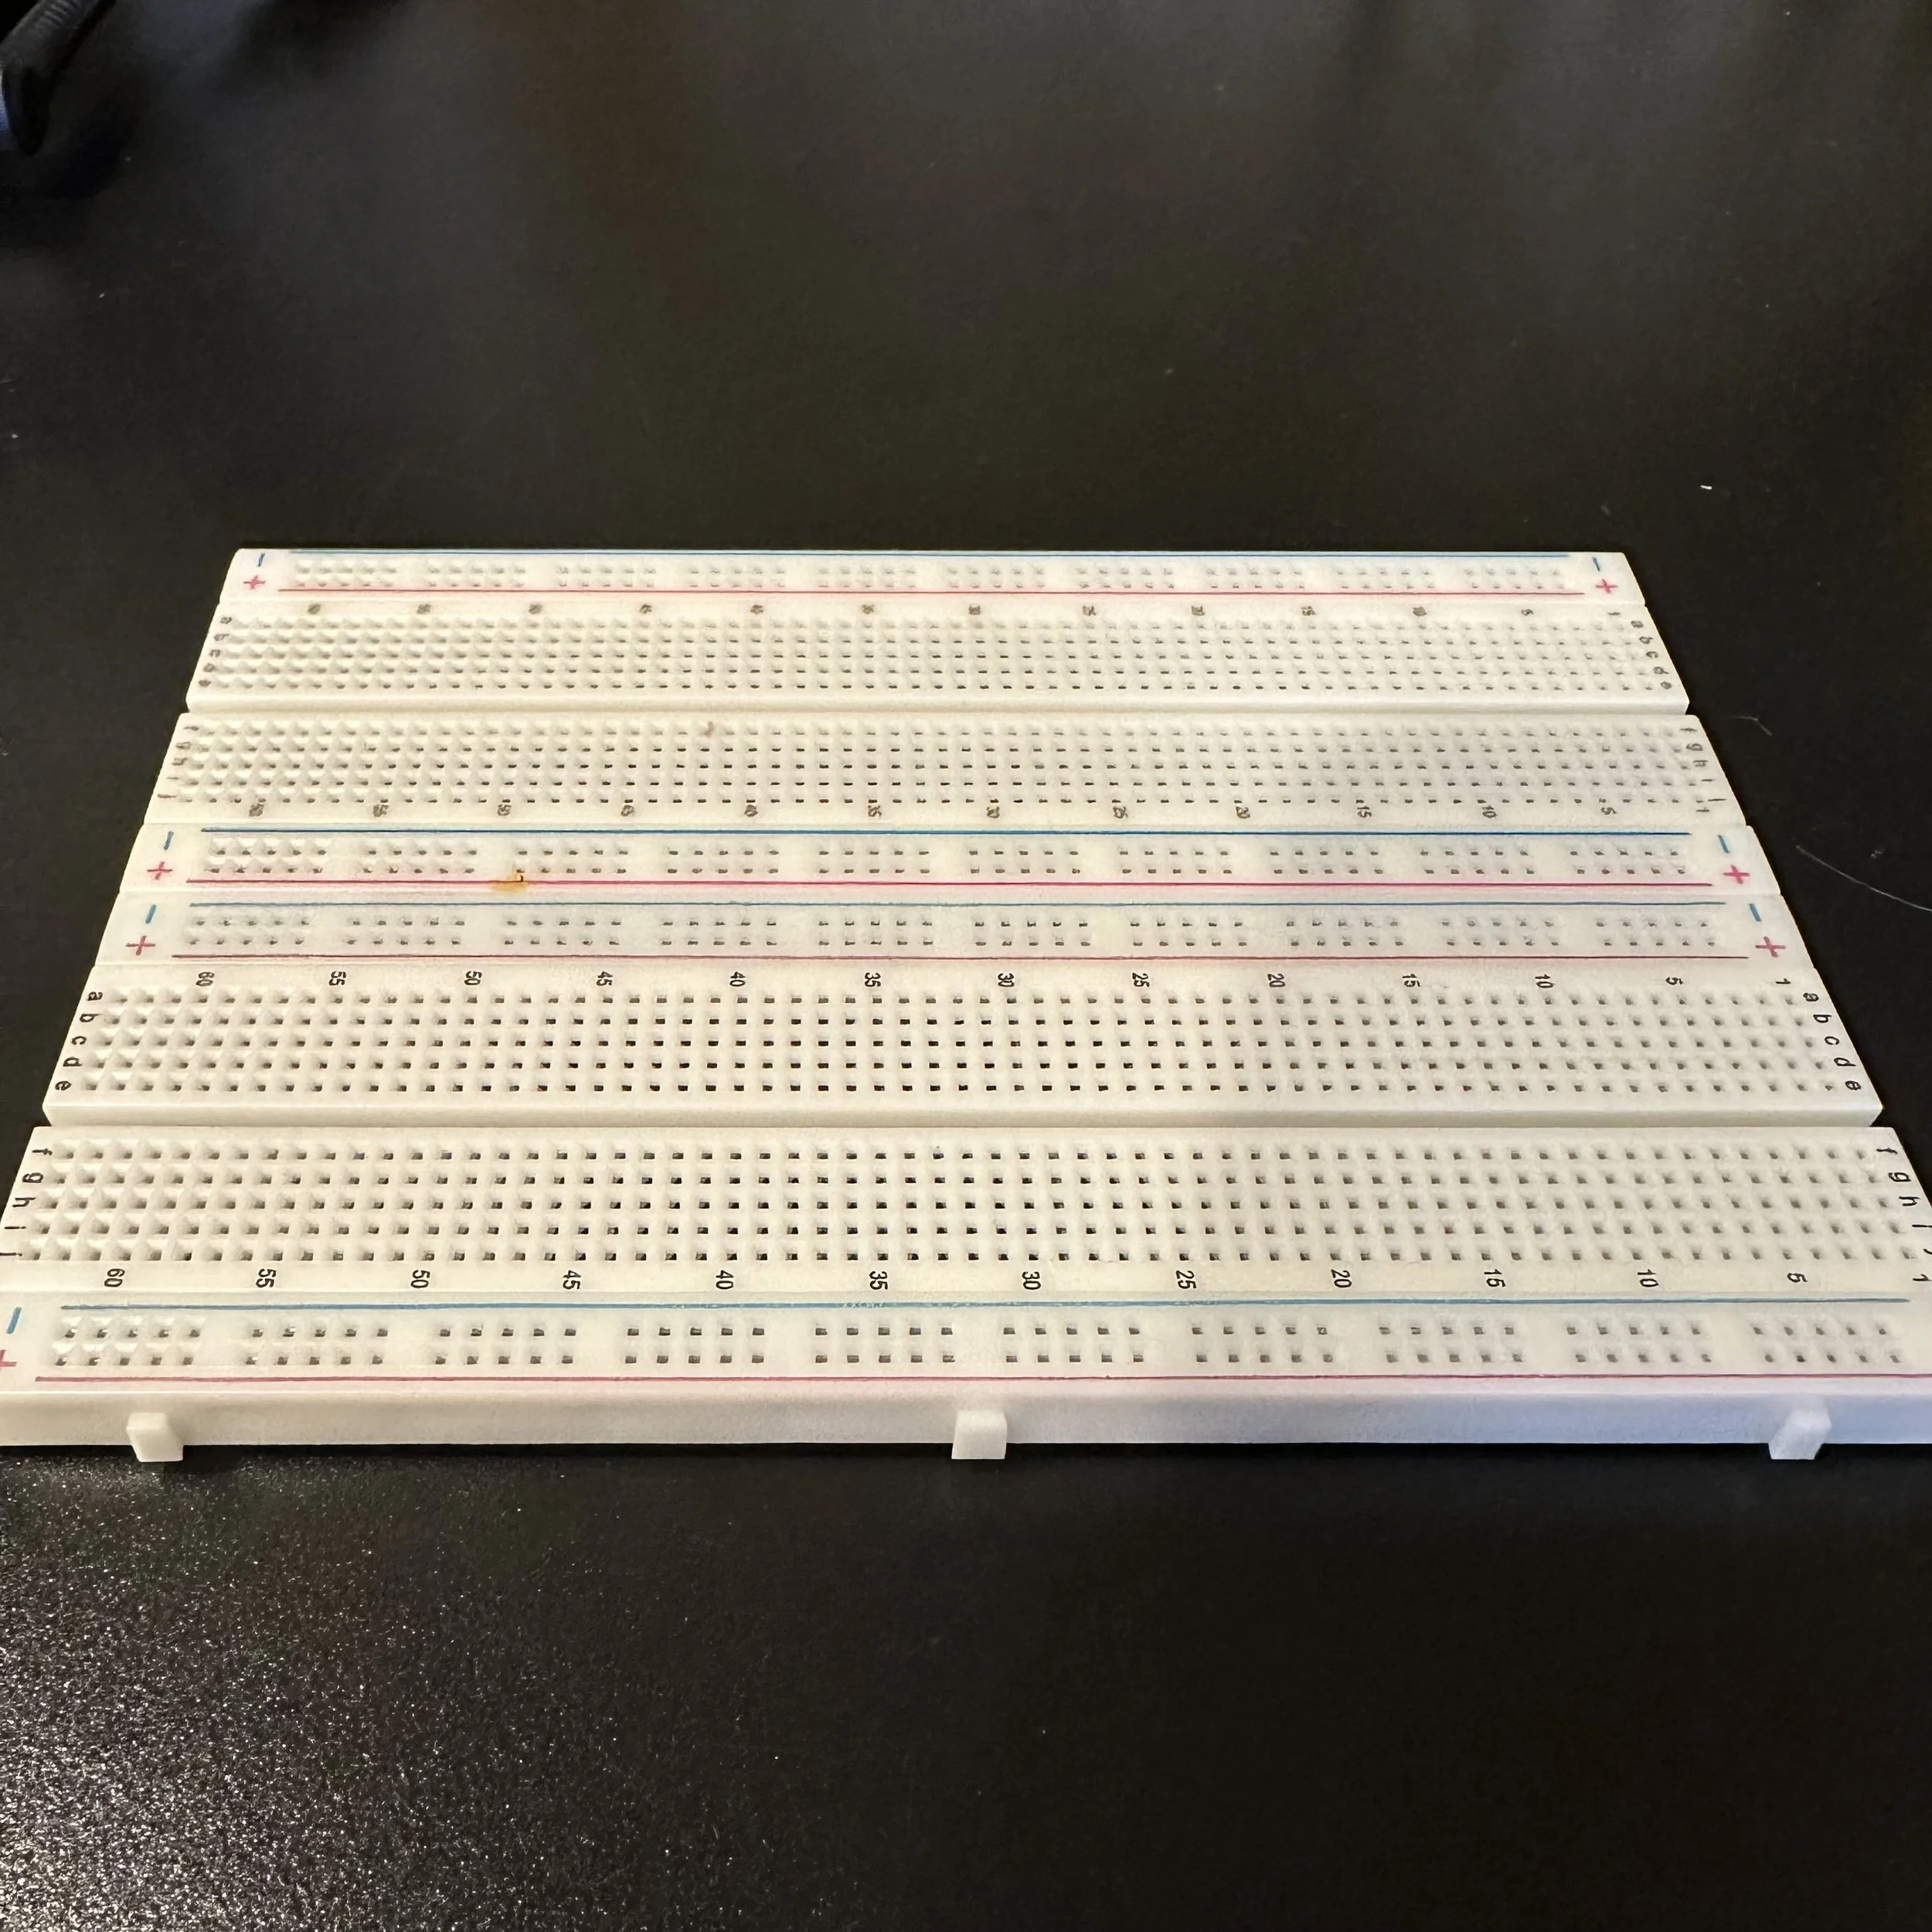
Once we have all the components we’ll need, it’s time to start putting everything together. To start, let’s first grab both of the breadboards and combine them into a single, larger breadboard. This will ensure that we have enough room for all of our paino keys and it’ll help us keep everything clean and organized as we’re building.
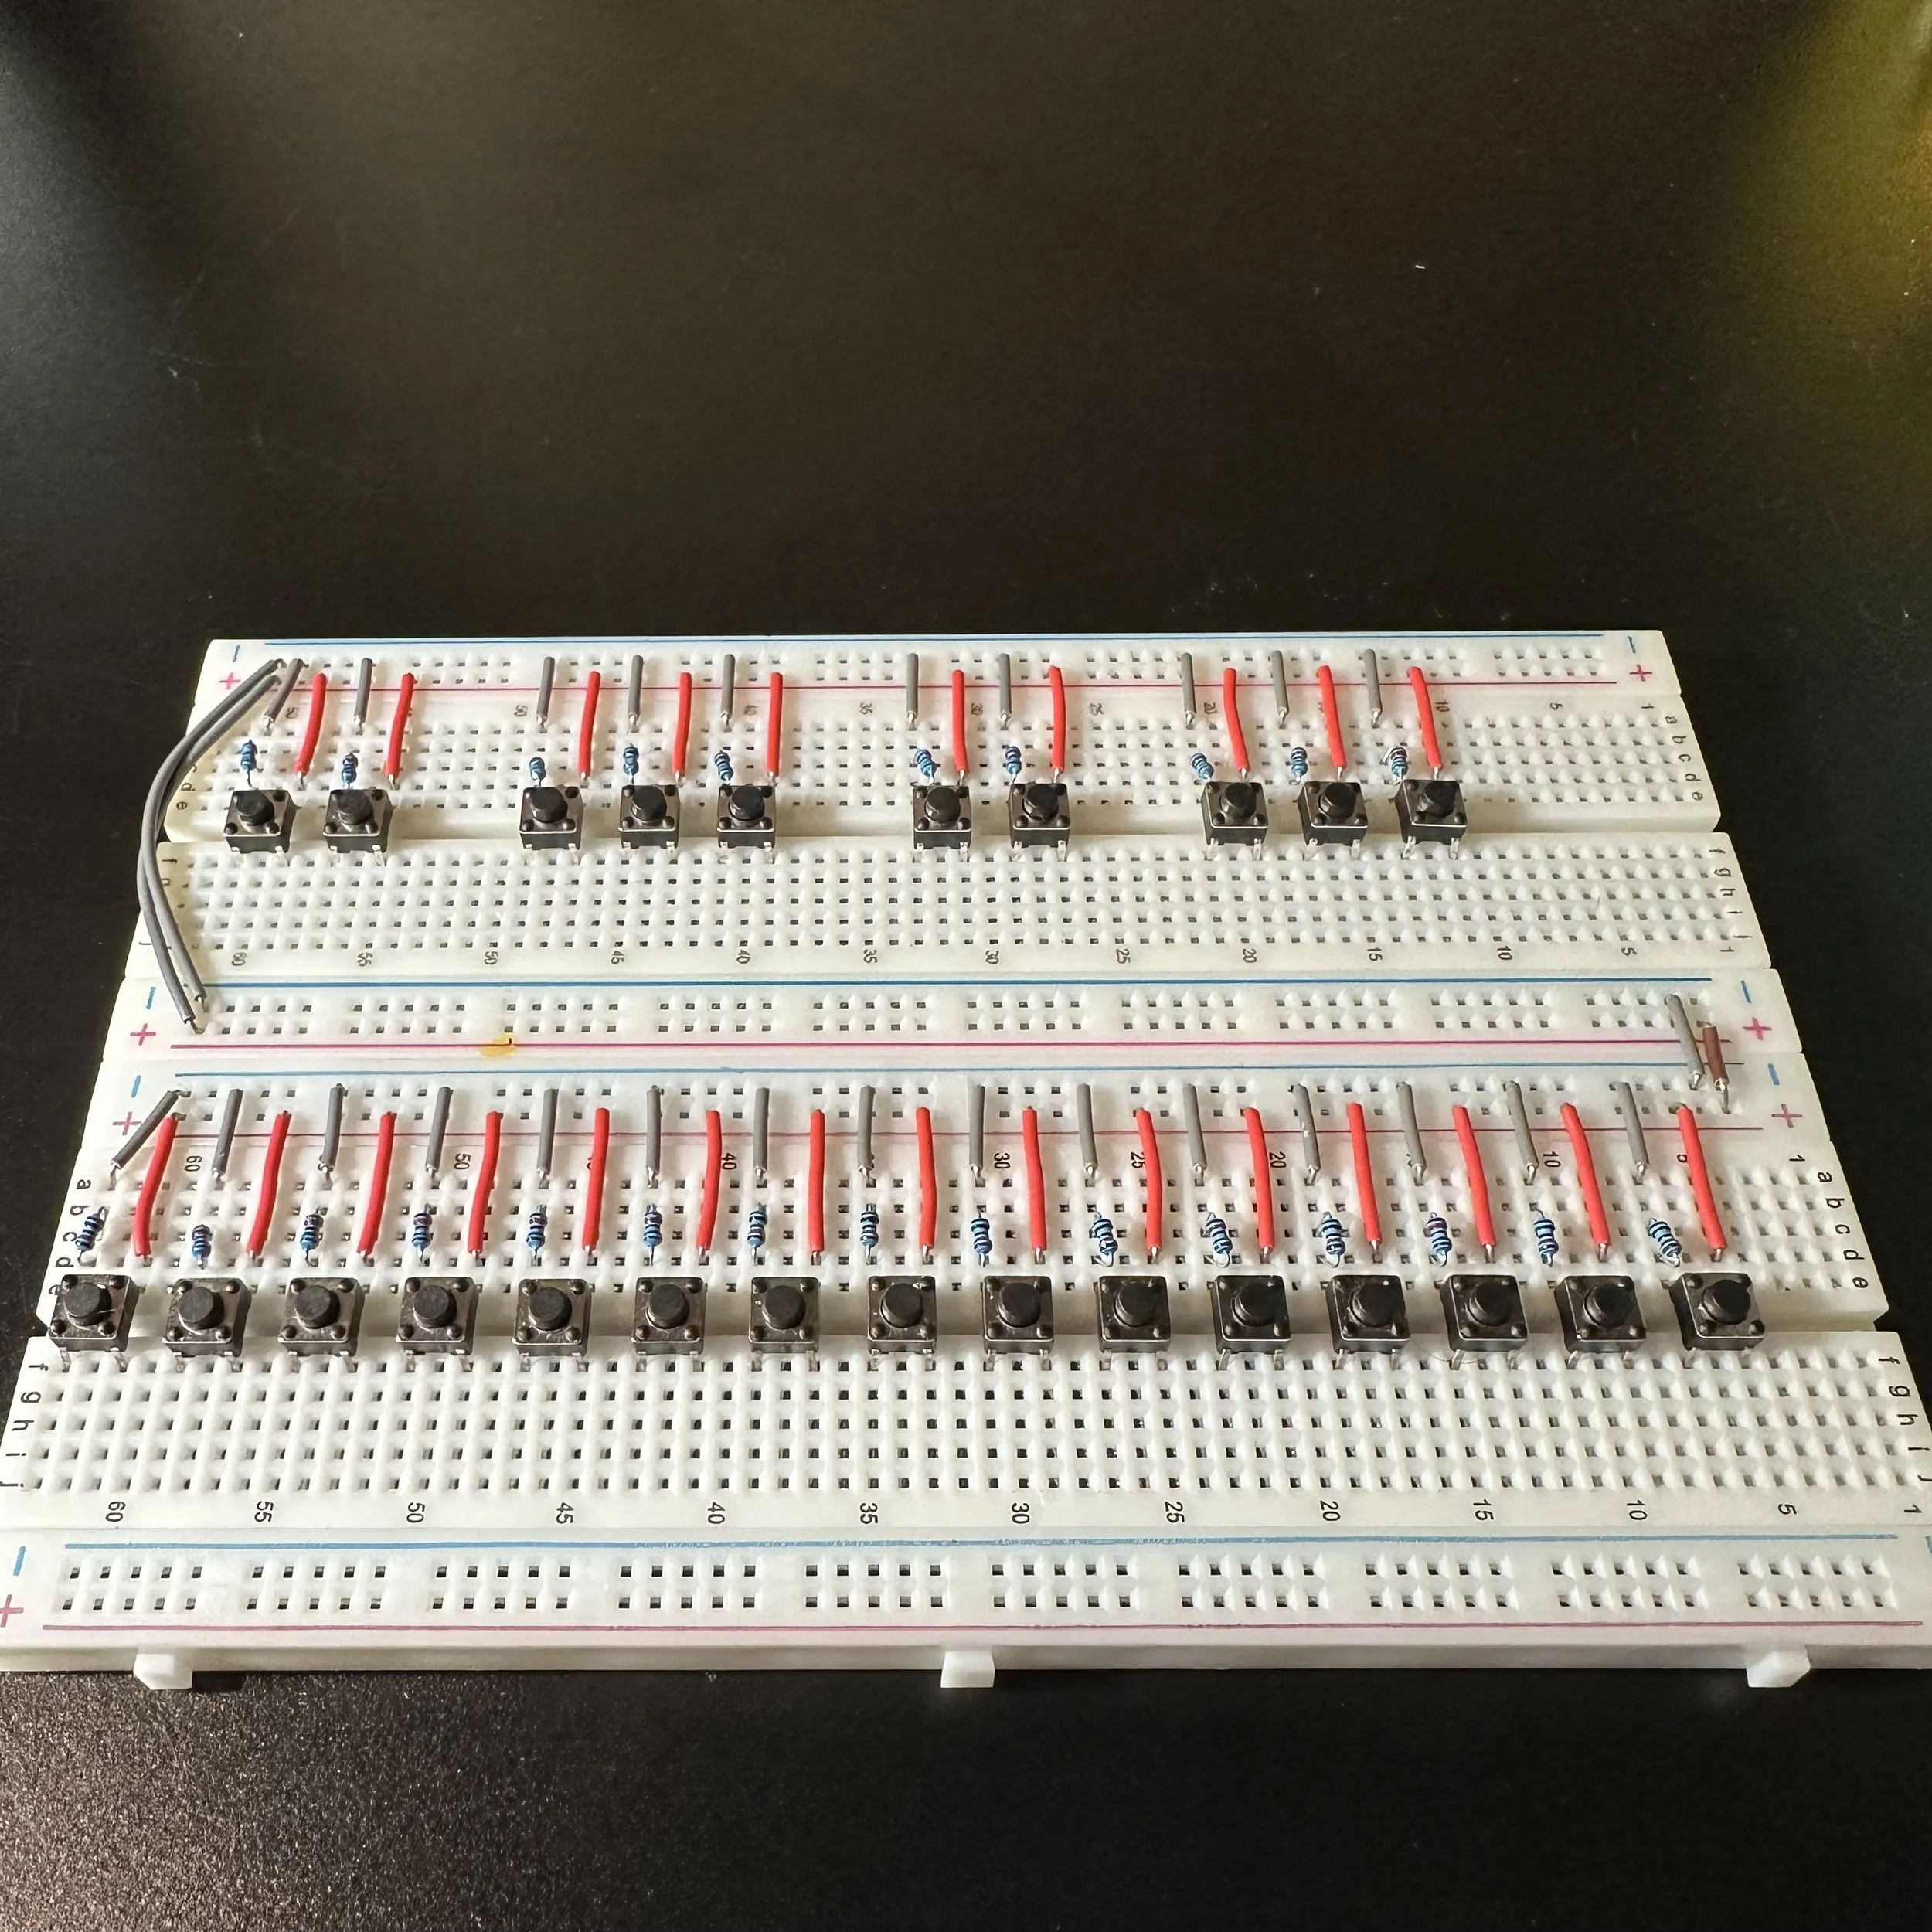
Now that we have our base, we can start adding the keys. I decided to go from right to left, leaving one space between each of the bottom row keys and spacing out the top ones to match their positoin on an actual piano.
After the push buttons/keys have been added, the next step is to connect the right prong of each push button to the power bus (red stripped pins), add a 10k Ohm resistor to left prong and connect this to the ground bus (blue stripped pins). You’ll also want to make sure that the middle power/ground busses are connected to each other and to at least one outer edge. The image below shows my layout.
Once you’ve got all of the keys connected and have linked your power/ground busses, the next thing we can do is to add the buzzer. This will allow our piano to actually make sound when the keys are pressed.
This step is pretty easy, as it only requires you to connect the black wire to the ground bus and the red wire to an empty spot on your breadboard, out of the way of other connections.
Once that’s done, it’s time to connect everything to the Arduino. I’ve created a handy table below that you can reference for connecting each button to its corresponding pin on the Arduino board. The piano keys are numbered based on their position on the piano, from left to right and I’ve labelled the buttons A - Y and matched each button to a buzzer frequency that best matches its corresponding key on a piano. This will also come in handy later, when we start programming and matching specific keys with their tones.
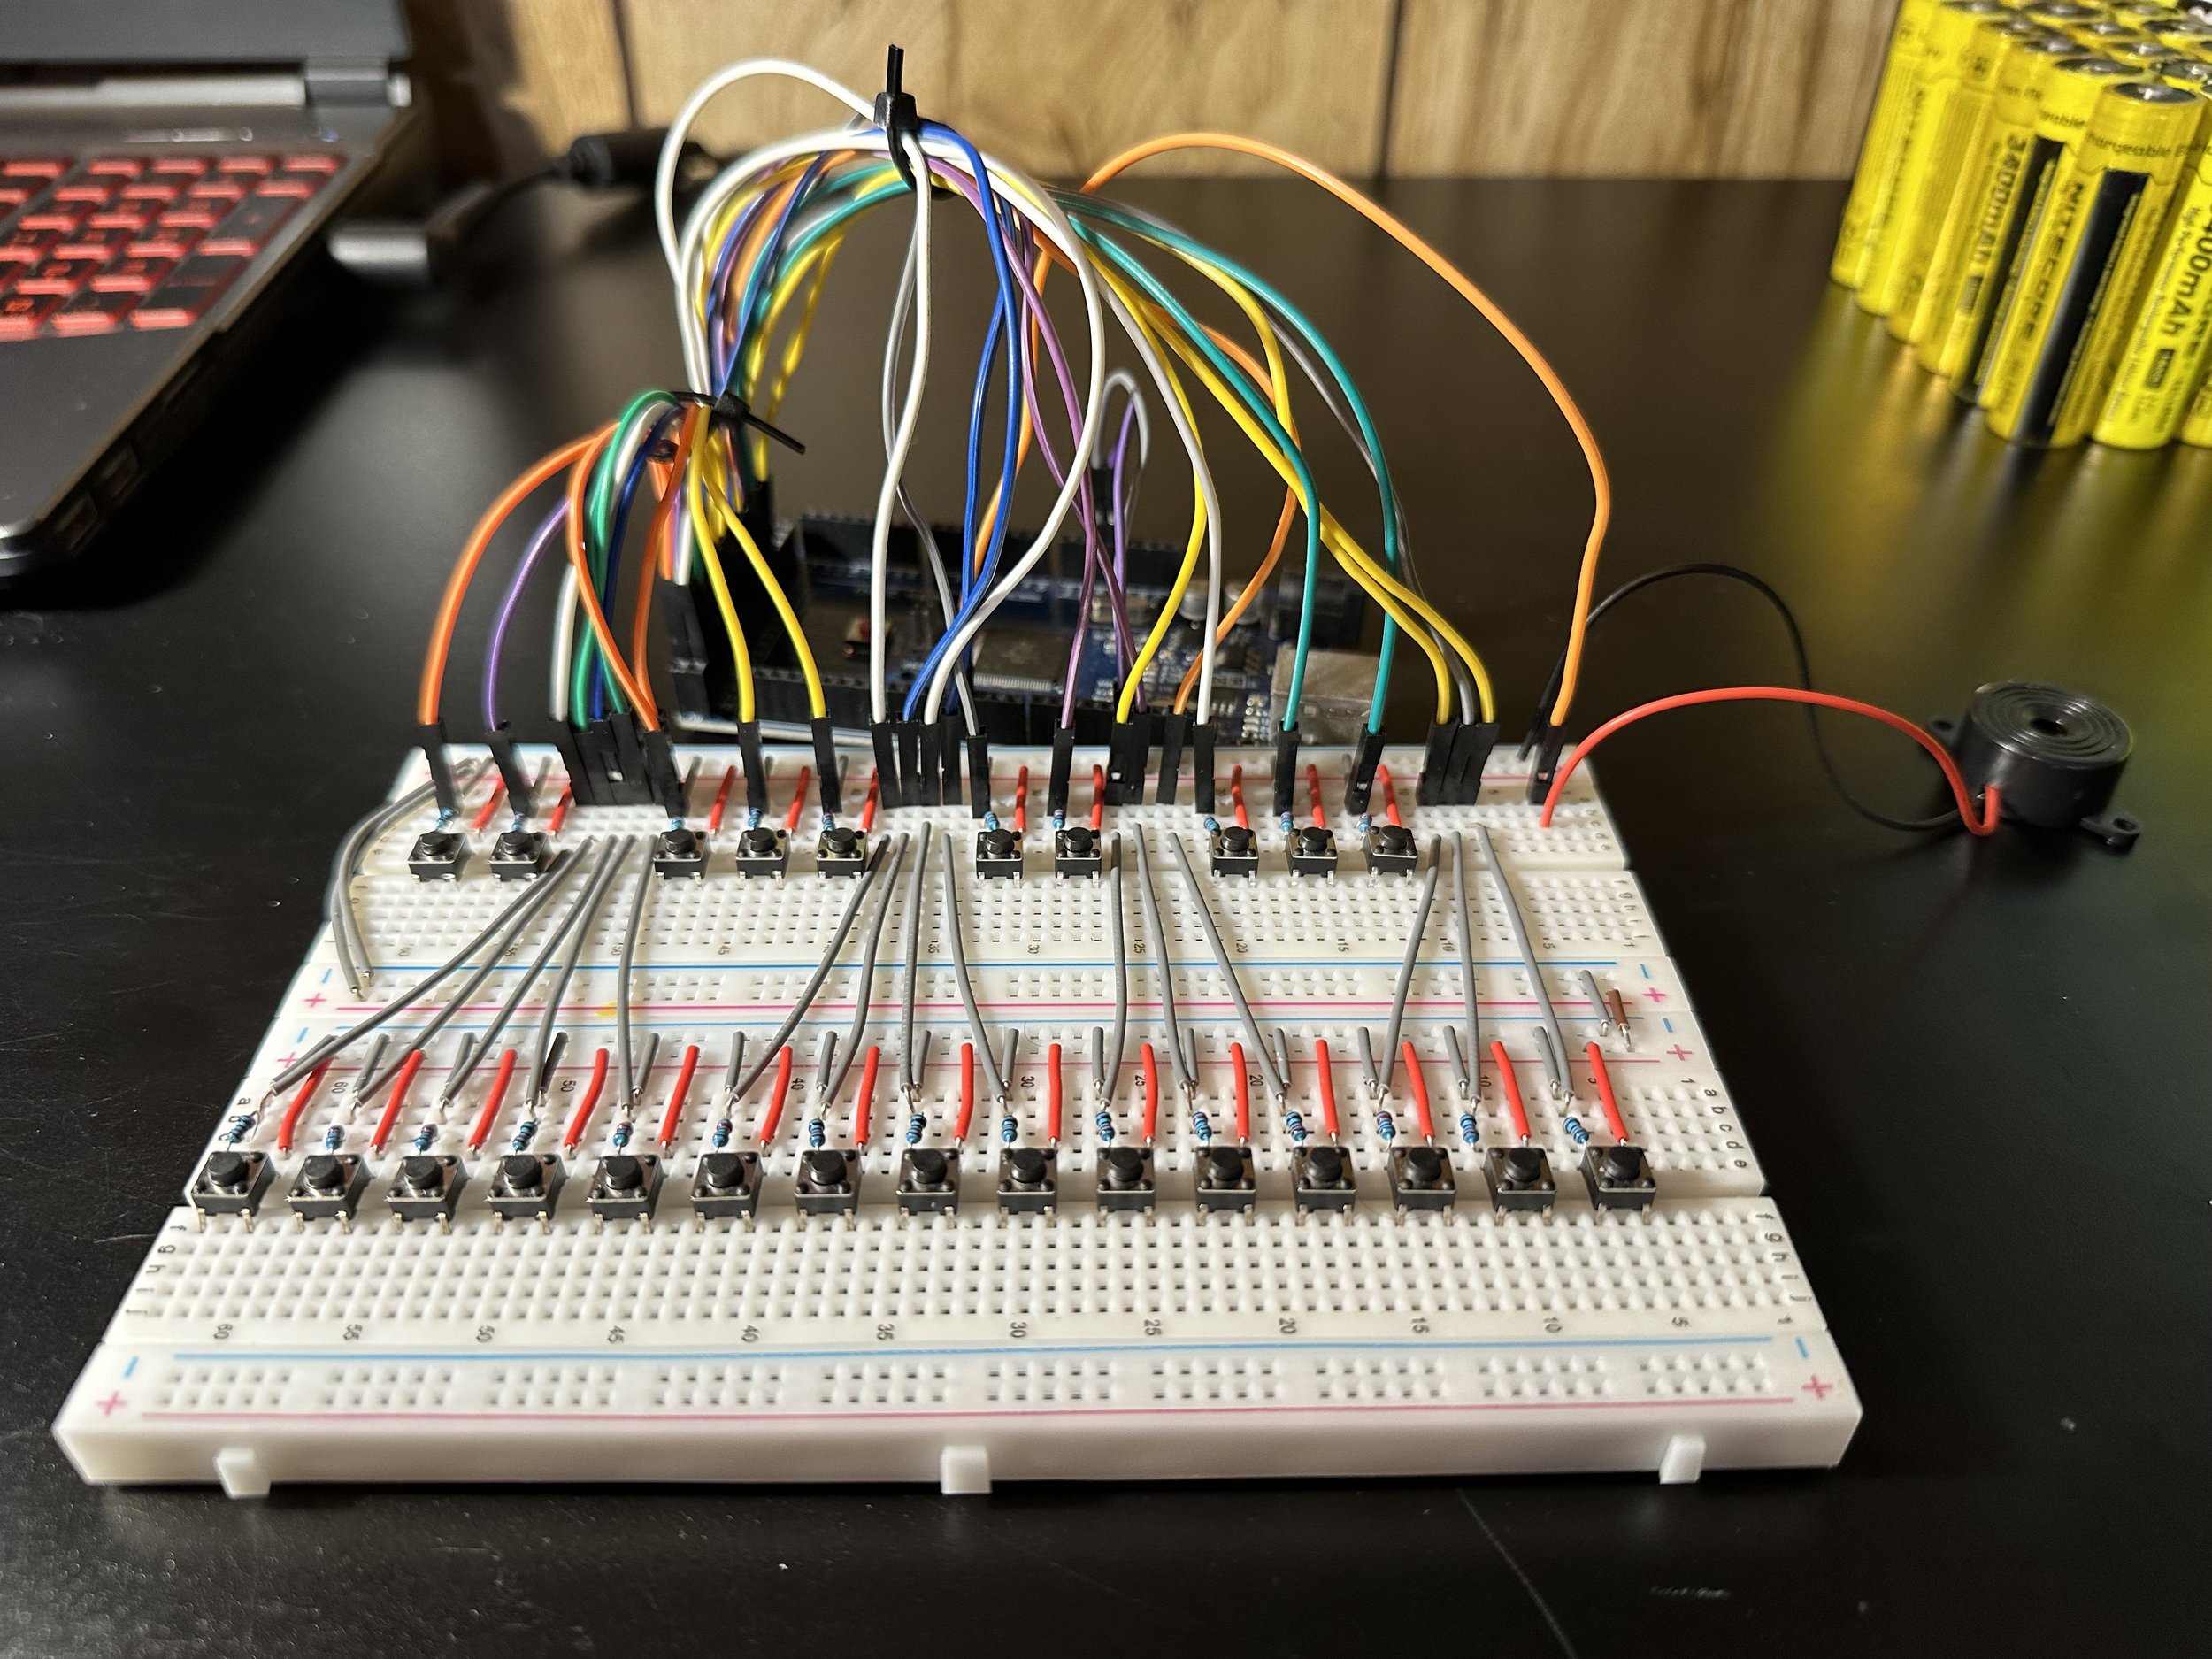
Your fully assembled piano should look something like this:
I used breadboard wires to help organize my layout a bit more and keep the wires from blocking easy access to the keys.
Adding the code:
Now that we have a fully assembled piano, it’s time to start coding so we can actually play it. To start, let’s open up the Arduino IDE. If you don’t have it installed yet, you can download it here [Software | Arduino] or if you’d prefer, you can code in your browser here [Cloud | Arduino].
One you have the IDE installed and open, let’s move on to connecting your buzzer and pins and creating variables to store the state for each button with the following code:
//Define the piezo buzzer and connect it to pin 4
#define note 4

//Create variables for buttons/keys
const int buttonA = 22;
const int buttonB = 23;
const int buttonC = 24;
const int buttonD = 25;
const int buttonE = 26;
const int buttonF = 27;
const int buttonG = 28;
const int buttonH = 29;
const int buttonI = 30;
const int buttonJ = 31;
const int buttonK = 32;
const int buttonL = 33;
const int buttonM = 34;
const int buttonN = 35;
const int buttonO = 36;
const int buttonP = 37;
const int buttonQ = 38;
const int buttonR = 39;
const int buttonS = 40;
const int buttonT = 41;
const int buttonU = 42;
const int buttonV = 43;
const int buttonW = 44;
const int buttonX = 45;
const int buttonY = 46;

//Create variables to store button state
int buttonStateA;
int buttonStateB;
int buttonStateC;
int buttonStateD;
int buttonStateE;
int buttonStateF;
int buttonStateG;
int buttonStateH;
int buttonStateI;
int buttonStateJ;
int buttonStateK;
int buttonStateL;
int buttonStateM;
int buttonStateN;
int buttonStateO;
int buttonStateP;
int buttonStateQ;
int buttonStateR;
int buttonStateS;
int buttonStateT;
int buttonStateU;
int buttonStateV;
int buttonStateW;
int buttonStateX;
int buttonStateY;
Note: you don’t have to use the same names I used for your variables, use something that will make it easy to keep track of which button is which and that will be easy to remember.
The next step is to test your buttons to make sure that each one works when pressed. To do this, you’ll be using the Serial Monitor, so you’ll need to initialize it and set a message to print for each button when it is pressed. You’ll also need to set each button as an INPUT, so the Arduino can detect when they’re pressed. The following code will help with that:
void setup() {
  //Boot up serial monitor
  Serial.begin(9600);

  //Set buttons as inputs
  pinMode(buttonA, INPUT);
  pinMode(buttonB, INPUT);
  pinMode(buttonC, INPUT);
  pinMode(buttonD, INPUT);
  pinMode(buttonE, INPUT);
  pinMode(buttonF, INPUT);
  pinMode(buttonG, INPUT);
  pinMode(buttonH, INPUT);
  pinMode(buttonI, INPUT);
  pinMode(buttonJ, INPUT);
  pinMode(buttonK, INPUT);
  pinMode(buttonL, INPUT);
  pinMode(buttonM, INPUT);
  pinMode(buttonN, INPUT);
  pinMode(buttonO, INPUT);
  pinMode(buttonP, INPUT);
  pinMode(buttonQ, INPUT);
  pinMode(buttonR, INPUT);
  pinMode(buttonS, INPUT);
  pinMode(buttonT, INPUT);
  pinMode(buttonU, INPUT);
  pinMode(buttonV, INPUT);
  pinMode(buttonW, INPUT);
  pinMode(buttonX, INPUT);
  pinMode(buttonY, INPUT);

}

void loop() {

  //Read button state and store it in variable
  buttonStateA = digitalRead(buttonA);
  buttonStateB = digitalRead(buttonB);
  buttonStateC = digitalRead(buttonC);
  buttonStateD = digitalRead(buttonD);
  buttonStateE = digitalRead(buttonE);
  buttonStateF = digitalRead(buttonF);
  buttonStateG = digitalRead(buttonG);
  buttonStateH = digitalRead(buttonH);
  buttonStateI = digitalRead(buttonI);
  buttonStateJ = digitalRead(buttonJ);
  buttonStateK = digitalRead(buttonK);
  buttonStateL = digitalRead(buttonL);
  buttonStateM = digitalRead(buttonM);
  buttonStateN = digitalRead(buttonN);
  buttonStateO = digitalRead(buttonO);
  buttonStateP = digitalRead(buttonP);
  buttonStateQ = digitalRead(buttonQ);
  buttonStateR = digitalRead(buttonR);
  buttonStateS = digitalRead(buttonS);
  buttonStateT = digitalRead(buttonT);
  buttonStateU = digitalRead(buttonU);
  buttonStateV = digitalRead(buttonV);
  buttonStateW = digitalRead(buttonW);
  buttonStateX = digitalRead(buttonX);
  buttonStateY = digitalRead(buttonY);


  //Tell the piezo buzzer what tone to use for each button
  if(buttonStateA == HIGH) {
    Serial.println("Button A Pressed");
  }
  if(buttonStateB == HIGH) {
    Serial.println("Button B Pressed");
  }
  if(buttonStateC == HIGH) {
    Serial.println("Button C Pressed");
  }
  if(buttonStateD == HIGH) {
    Serial.println("Button D Pressed");
  }
  if(buttonStateE == HIGH) {
    Serial.println("Button E Pressed");
  }
  if(buttonStateF == HIGH) {
    Serial.println("Button F Pressed");
  }
  if(buttonStateG == HIGH) {
    Serial.println("Button G Pressed");
  }
  if(buttonStateH == HIGH) {
    Serial.println("Button H Pressed");
  }
  if(buttonStateI == HIGH) {
    Serial.println("Button I Pressed");
  }
  if(buttonStateJ == HIGH) {
    Serial.println("Button J Pressed");
  }
  if(buttonStateK == HIGH) {
    Serial.println("Button K Pressed");
  }
  if(buttonStateL == HIGH) {
    Serial.println("Button L Pressed");
  }
  if(buttonStateM == HIGH) {
    Serial.println("Button M Pressed");
  }
  if(buttonStateN == HIGH) {
    Serial.println("Button N Pressed");
  }
  if(buttonStateO == HIGH) {
    Serial.println("Button O Pressed");
  }
  if(buttonStateP == HIGH) {
    Serial.println("Button P Pressed");
  }
  if(buttonStateQ == HIGH) {
    Serial.println("Button Q Pressed");
  }
  if(buttonStateR == HIGH) {
    Serial.println("Button R Pressed");
  }
  if(buttonStateS == HIGH) {
    Serial.println("Button S Pressed");
  }
  if(buttonStateT == HIGH) {
    Serial.println("Button T Pressed");
  }
  if(buttonStateU == HIGH) {
    Serial.println("Button U Pressed");
  }
  if(buttonStateV == HIGH) {
    Serial.println("Button V Pressed");
  }
  if(buttonStateW == HIGH) {
    Serial.println("Button W Pressed");
  }
  if(buttonStateX == HIGH) {
    Serial.println("Button X Pressed");
  }
  if(buttonStateY == HIGH) {
    Serial.println("Button Y Pressed");
  }

}
Once you’ve finished adding the above code, let’s compile it, upload it to our piano, open up the Serial Monitor and test the buttons.
Note: this step isn’t completely necessary but I recommend completing it just to get into the habit of testing projects at regular intervals. Tesitng in intervals can help catch bugs early, which potentially saves a lot of tedious work later on.
After you’ve verified that the buttons are working, the next step is to connect each button push to a specific tone from the buzzer. To do that, you just need to add the correct tone to the if statements you created earlier to test the buttons in the Serial Monitor.
The fully completed code should look something like what’s shown below:
//Define the piezo buzzer and connect it to pin 4
#define note 4

//Create variables for buttons/keys
const int buttonA = 22;
const int buttonB = 23;
const int buttonC = 24;
const int buttonD = 25;
const int buttonE = 26;
const int buttonF = 27;
const int buttonG = 28;
const int buttonH = 29;
const int buttonI = 30;
const int buttonJ = 31;
const int buttonK = 32;
const int buttonL = 33;
const int buttonM = 34;
const int buttonN = 35;
const int buttonO = 36;
const int buttonP = 37;
const int buttonQ = 38;
const int buttonR = 39;
const int buttonS = 40;
const int buttonT = 41;
const int buttonU = 42;
const int buttonV = 43;
const int buttonW = 44;
const int buttonX = 45;
const int buttonY = 46;

//Create variables to store button state
int buttonStateA;
int buttonStateB;
int buttonStateC;
int buttonStateD;
int buttonStateE;
int buttonStateF;
int buttonStateG;
int buttonStateH;
int buttonStateI;
int buttonStateJ;
int buttonStateK;
int buttonStateL;
int buttonStateM;
int buttonStateN;
int buttonStateO;
int buttonStateP;
int buttonStateQ;
int buttonStateR;
int buttonStateS;
int buttonStateT;
int buttonStateU;
int buttonStateV;
int buttonStateW;
int buttonStateX;
int buttonStateY;

void setup() {
  //Boot up serial monitor
  Serial.begin(9600);

  //Set piezo buzzer as output
  pinMode(note, OUTPUT);

  //Set buttons as inputs
  pinMode(buttonA, INPUT);
  pinMode(buttonB, INPUT);
  pinMode(buttonC, INPUT);
  pinMode(buttonD, INPUT);
  pinMode(buttonE, INPUT);
  pinMode(buttonF, INPUT);
  pinMode(buttonG, INPUT);
  pinMode(buttonH, INPUT);
  pinMode(buttonI, INPUT);
  pinMode(buttonJ, INPUT);
  pinMode(buttonK, INPUT);
  pinMode(buttonL, INPUT);
  pinMode(buttonM, INPUT);
  pinMode(buttonN, INPUT);
  pinMode(buttonO, INPUT);
  pinMode(buttonP, INPUT);
  pinMode(buttonQ, INPUT);
  pinMode(buttonR, INPUT);
  pinMode(buttonS, INPUT);
  pinMode(buttonT, INPUT);
  pinMode(buttonU, INPUT);
  pinMode(buttonV, INPUT);
  pinMode(buttonW, INPUT);
  pinMode(buttonX, INPUT);
  pinMode(buttonY, INPUT);

}

void loop() {

  //Read button state and store it in variable
  buttonStateA = digitalRead(buttonA);
  buttonStateB = digitalRead(buttonB);
  buttonStateC = digitalRead(buttonC);
  buttonStateD = digitalRead(buttonD);
  buttonStateE = digitalRead(buttonE);
  buttonStateF = digitalRead(buttonF);
  buttonStateG = digitalRead(buttonG);
  buttonStateH = digitalRead(buttonH);
  buttonStateI = digitalRead(buttonI);
  buttonStateJ = digitalRead(buttonJ);
  buttonStateK = digitalRead(buttonK);
  buttonStateL = digitalRead(buttonL);
  buttonStateM = digitalRead(buttonM);
  buttonStateN = digitalRead(buttonN);
  buttonStateO = digitalRead(buttonO);
  buttonStateP = digitalRead(buttonP);
  buttonStateQ = digitalRead(buttonQ);
  buttonStateR = digitalRead(buttonR);
  buttonStateS = digitalRead(buttonS);
  buttonStateT = digitalRead(buttonT);
  buttonStateU = digitalRead(buttonU);
  buttonStateV = digitalRead(buttonV);
  buttonStateW = digitalRead(buttonW);
  buttonStateX = digitalRead(buttonX);
  buttonStateY = digitalRead(buttonY);


  //Tell the piezo buzzer what tone to use for each button
  if(buttonStateA == HIGH) {
    tone(note, 349.23, 300);
    Serial.println("Button A Pressed");
  }
  if(buttonStateB == HIGH) {
    tone(note, 369.99, 300);
    Serial.println("Button B Pressed");
  }
  if(buttonStateC == HIGH) {
    tone(note, 392.00, 300);
    Serial.println("Button C Pressed");
  }
  if(buttonStateD == HIGH) {
    tone(note, 415.30, 300);
    Serial.println("Button D Pressed");
  }
  if(buttonStateE == HIGH) {
    tone(note, 440.00, 300);
    Serial.println("Button E Pressed");
  }
  if(buttonStateF == HIGH) {
    tone(note, 466.16, 300);
    Serial.println("Button F Pressed");
  }
  if(buttonStateG == HIGH) {
    tone(note, 493.88, 300);
    Serial.println("Button G Pressed");
  }
  if(buttonStateH == HIGH) {
    tone(note, 523.25, 300);
    Serial.println("Button H Pressed");
  }
  if(buttonStateI == HIGH) {
    tone(note, 554.37, 300);
    Serial.println("Button I Pressed");
  }
  if(buttonStateJ == HIGH) {
    tone(note, 587.33, 300);
    Serial.println("Button J Pressed");
  }
  if(buttonStateK == HIGH) {
    tone(note, 622.25, 300);
    Serial.println("Button K Pressed");
  }
  if(buttonStateL == HIGH) {
    tone(note, 659.25, 300);
    Serial.println("Button L Pressed");
  }
  if(buttonStateM == HIGH) {
    tone(note, 698.46, 300);
    Serial.println("Button M Pressed");
  }
  if(buttonStateN == HIGH) {
    tone(note, 739.99, 300);
    Serial.println("Button N Pressed");
  }
  if(buttonStateO == HIGH) {
    tone(note, 783.99, 300);
    Serial.println("Button O Pressed");
  }
  if(buttonStateP == HIGH) {
    tone(note, 830.61, 300);
    Serial.println("Button P Pressed");
  }
  if(buttonStateQ == HIGH) {
    tone(note, 880.00, 300);
    Serial.println("Button Q Pressed");
  }
  if(buttonStateR == HIGH) {
    tone(note, 932.33, 300);
    Serial.println("Button R Pressed");
  }
  if(buttonStateS == HIGH) {
    tone(note, 987.77, 300);
    Serial.println("Button S Pressed");
  }
  if(buttonStateT == HIGH) {
    tone(note, 1046.50, 300);
    Serial.println("Button T Pressed");
  }
  if(buttonStateU == HIGH) {
    tone(note, 1108.73, 300);
    Serial.println("Button U Pressed");
  }
  if(buttonStateV == HIGH) {
    tone(note, 1174.66, 300);
    Serial.println("Button V Pressed");
  }
  if(buttonStateW == HIGH) {
    tone(note, 1244.51, 300);
    Serial.println("Button W Pressed");
  }
  if(buttonStateX == HIGH) {
    tone(note, 1318.51, 300);
    Serial.println("Button X Pressed");
  }
  if(buttonStateY == HIGH) {
    tone(note, 1396.91, 300);
    Serial.println("Button Y Pressed");
  }

}
From here, all that’s left is to compile the code, upload it to your piano and start making music. Since you now know how to use buttons and buzzers, see what else you can do with either or both types of component.
Remember, your only real limits are your imagination, adaptability and drive to succeed!


